


The Most Detailed Guide to Creating a Facebook Ad Account in 2024

To run a campaign on Facebook, the first thing you can’t do without is an ad account. Below, The7 will walk you through how to create a Facebook ad account. Read on to find out more!
Explore The7’s services:
- Facebook advertising services in Ho Chi Minh City
- Facebook advertising services in Hanoi
- Facebook advertising services in Da Nang
Types of Facebook Ad Accounts
Personal Facebook Ad Account
Personal account (a personal ad account) is the most widely used type of account today, and it is the default account you get when you start using Facebook.
This type of account represents a specific individual and comes with all the essential features, such as posting photos and videos, writing posts and receiving engagement like likes, shares, comments and more. With a personal account, you can run Facebook ads for small, simple needs.
Business Facebook Ad Account
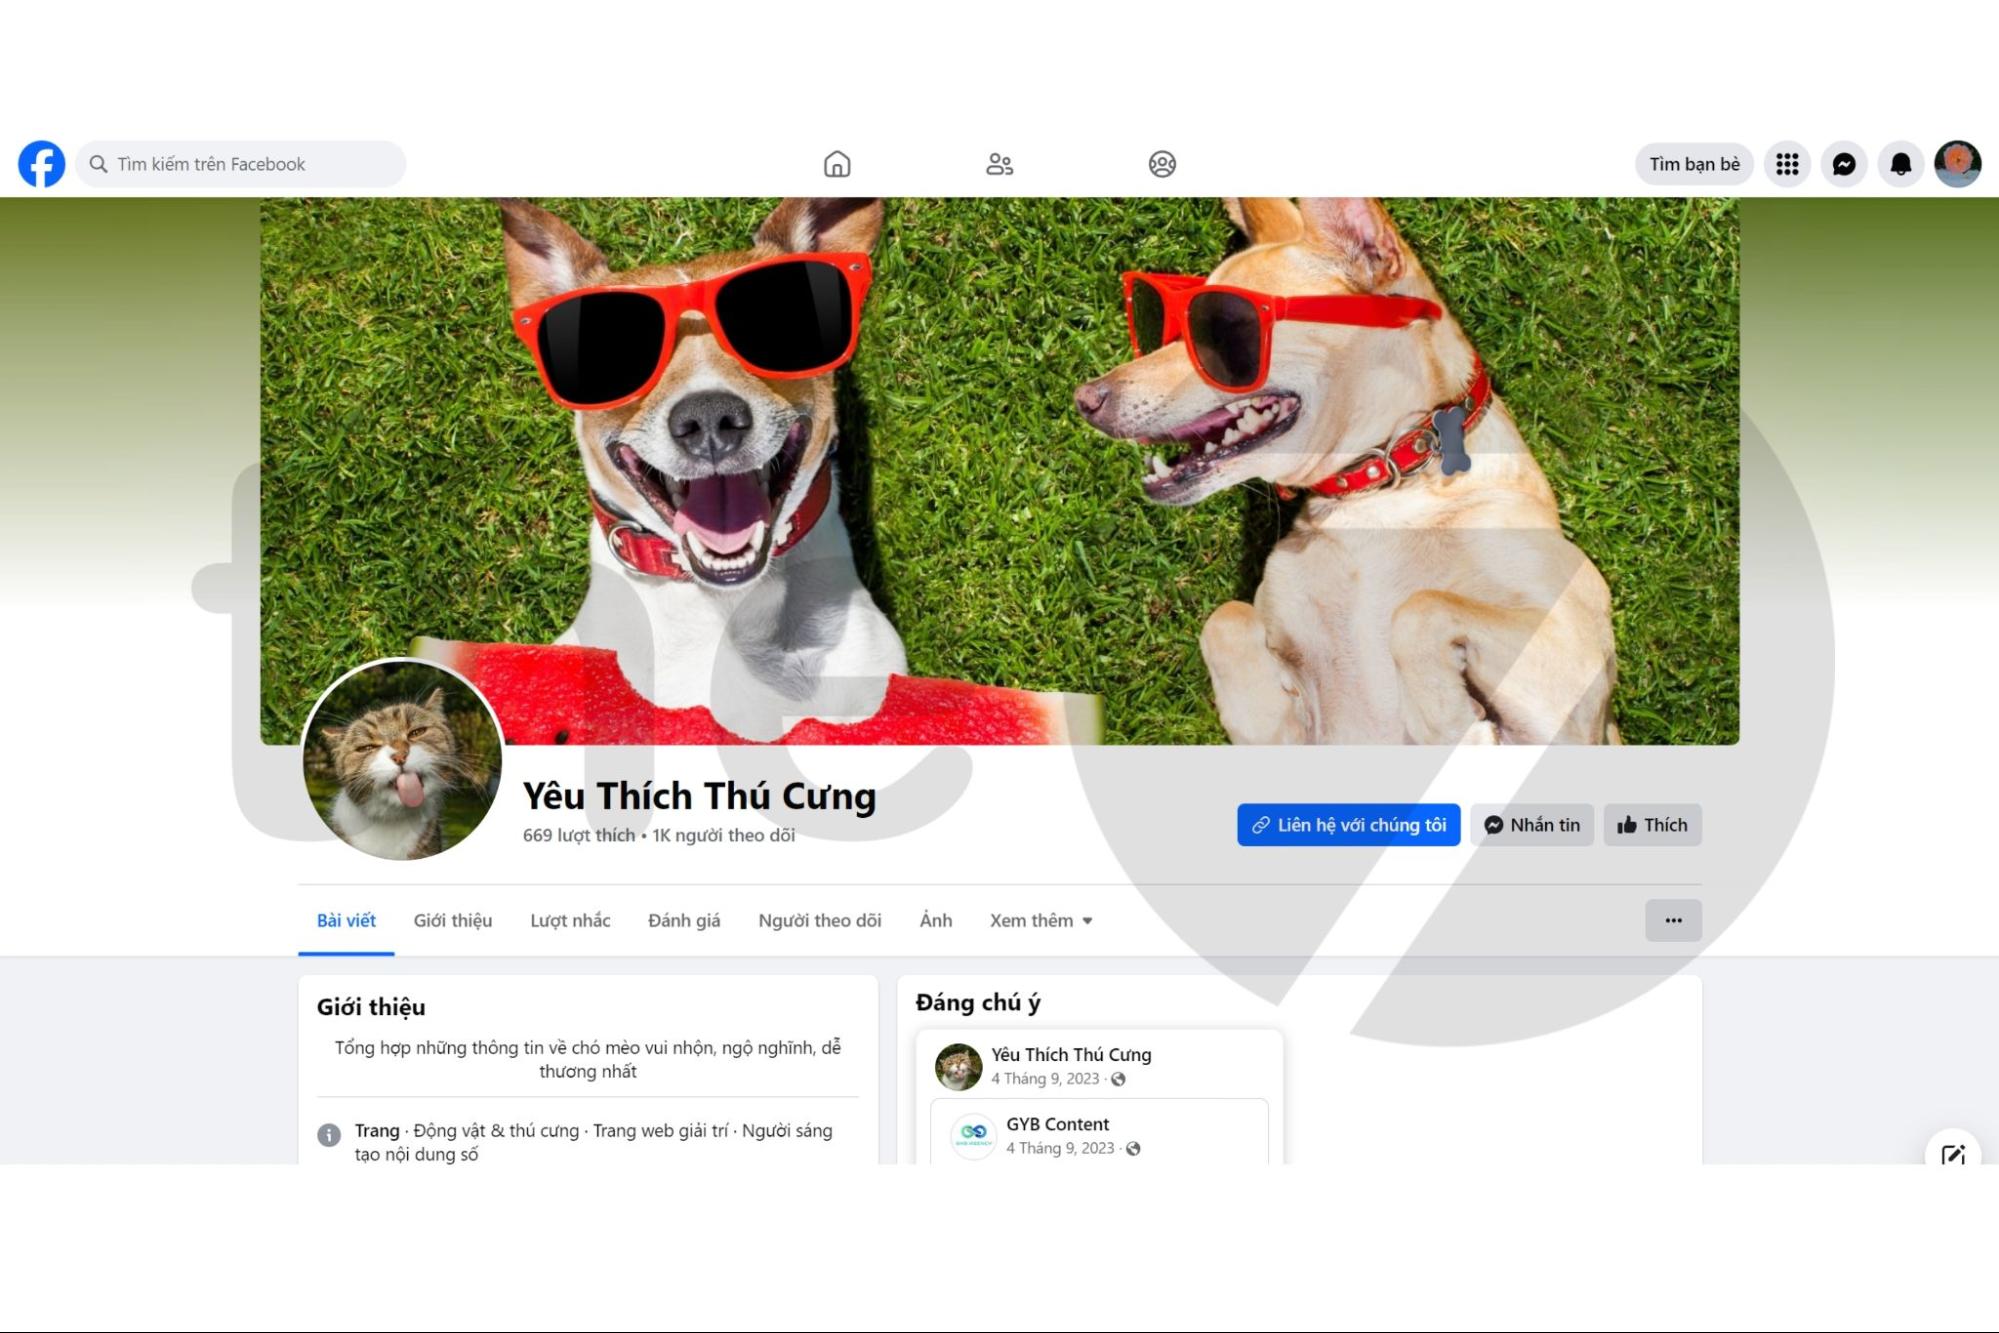
A business account is more specialized because it has no personal user profile, so you can’t take actions like liking, sharing or chatting the way you can with a regular personal account. This type of account is usually used to manage a Facebook Page, create events, build a brand and more.
The Simplest Guide to Creating a Facebook Ad Account
How to Create a Personal Facebook Ad Account
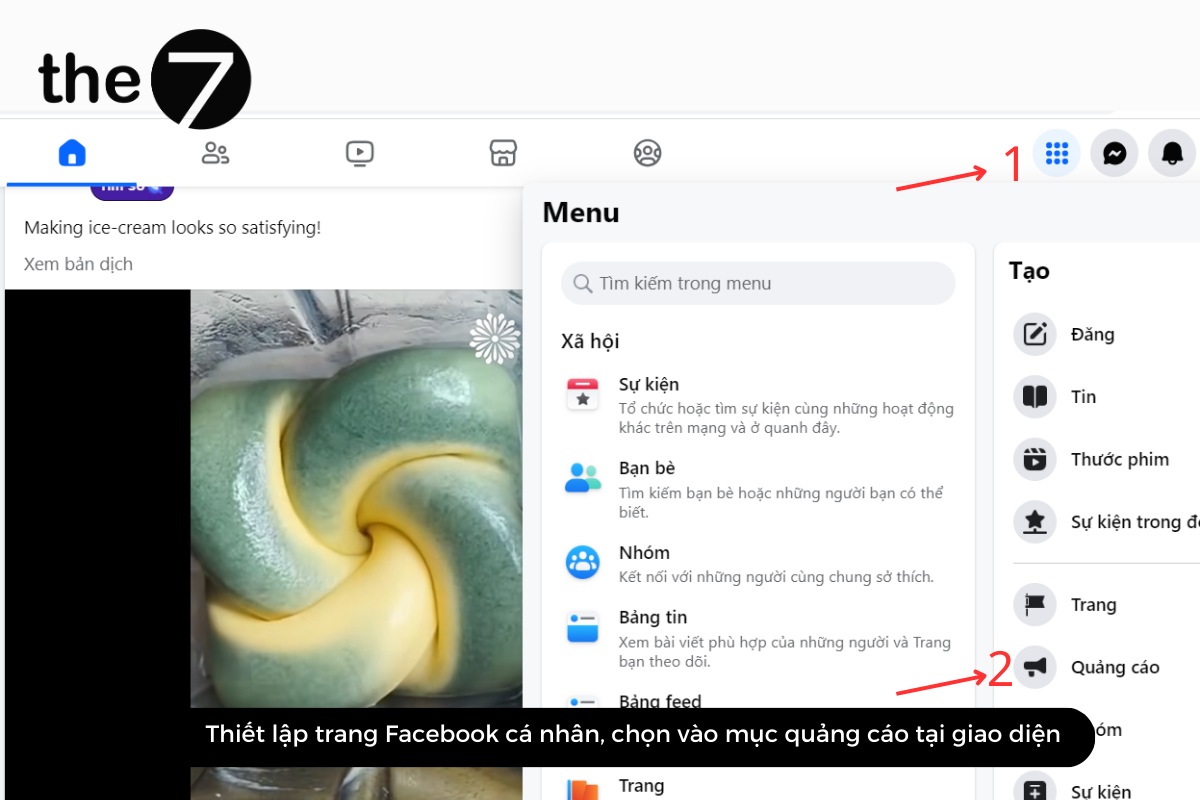
Step 1: Set up your personal Facebook page and select the advertising section in the interface.
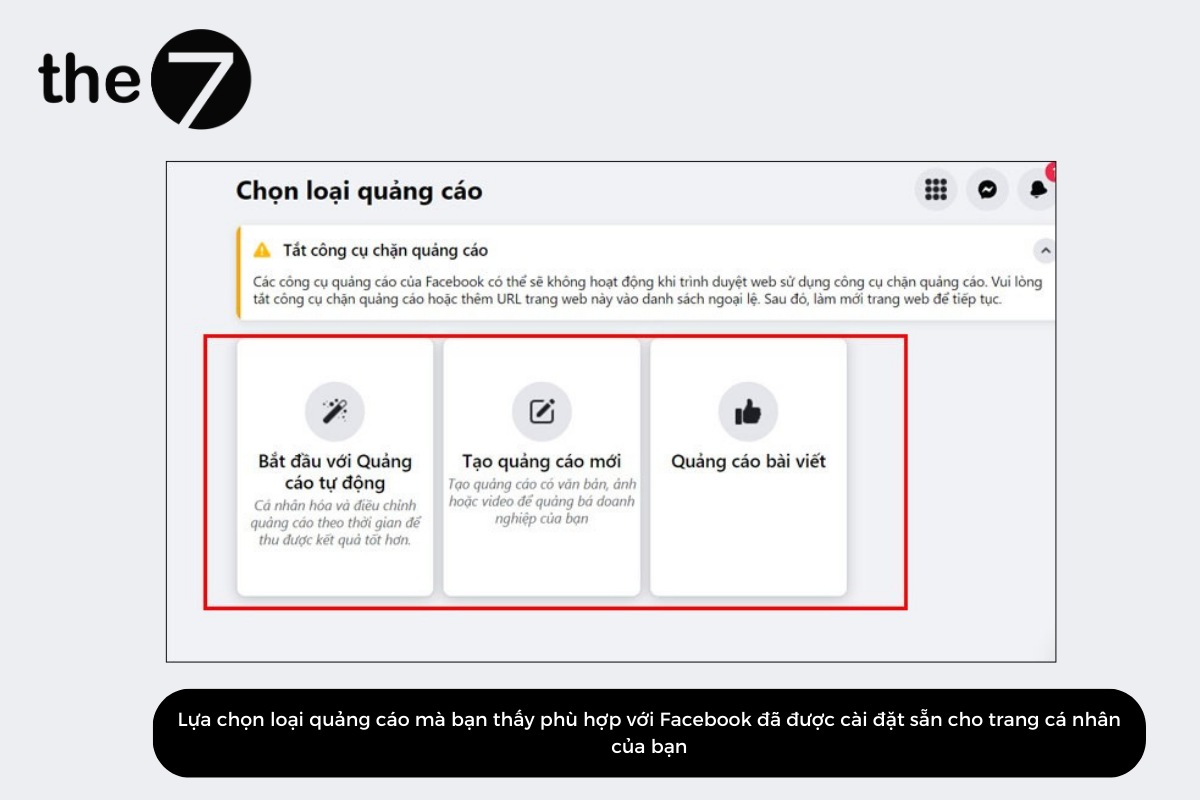
Step 2: Choose the type of ad that suits you from the options Facebook has already set up for your personal page.
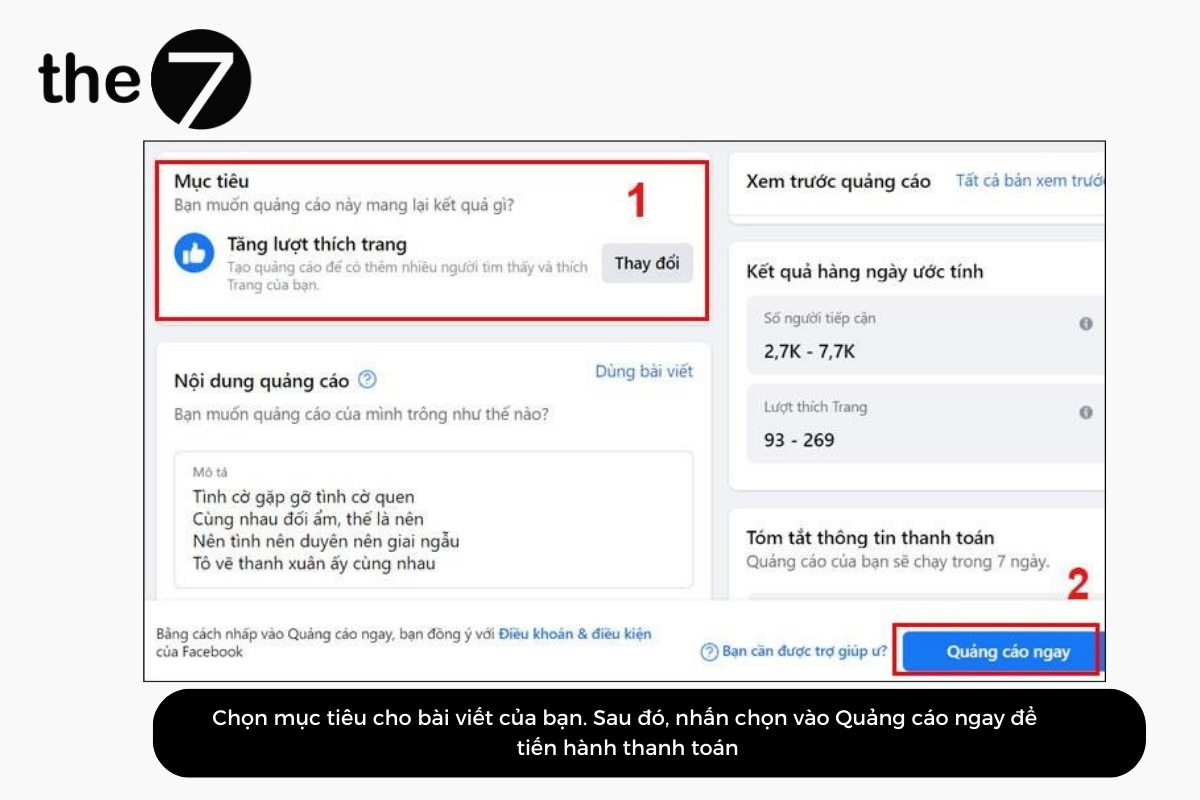
Step 3: Choose an objective for your post. Then click Advertise Now to proceed to payment.
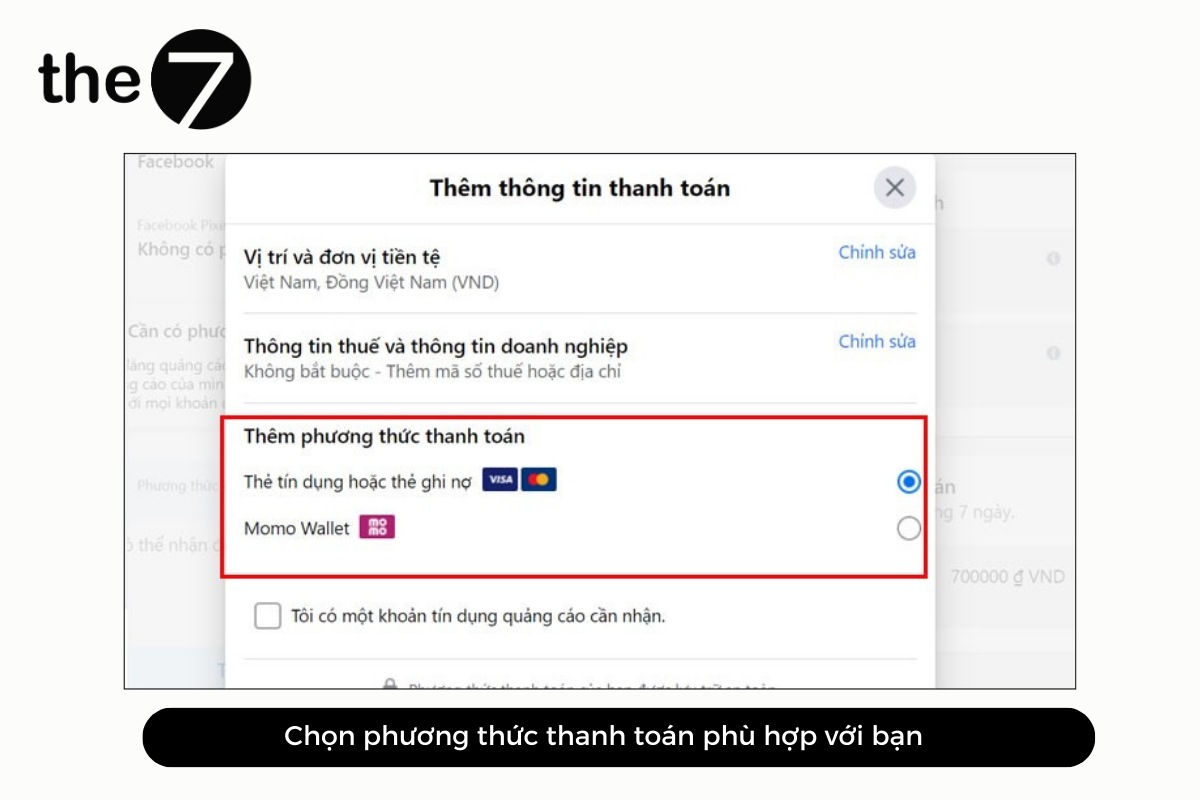
Step 4: Choose the payment method that works best for you. Currently, Facebook lets you use two main payment methods: paying through a MoMo wallet, or paying with a credit or debit card. Click Next to enter your details.
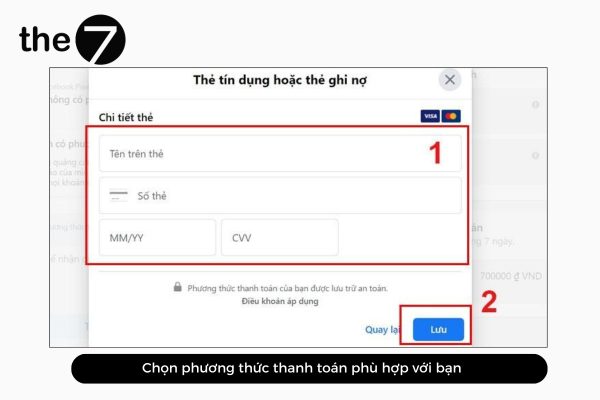
Step 5: Fill in all of your payment information. Save it to complete the steps for creating a personal Facebook ad account.
Step 6: Facebook will send you a verification email. Open your inbox and complete the verification, and you’re done.
How to Create a Business Ad Account on Facebook
Step 1: Go to https://business.facebook.com/ to start creating your Facebook Business ad account.
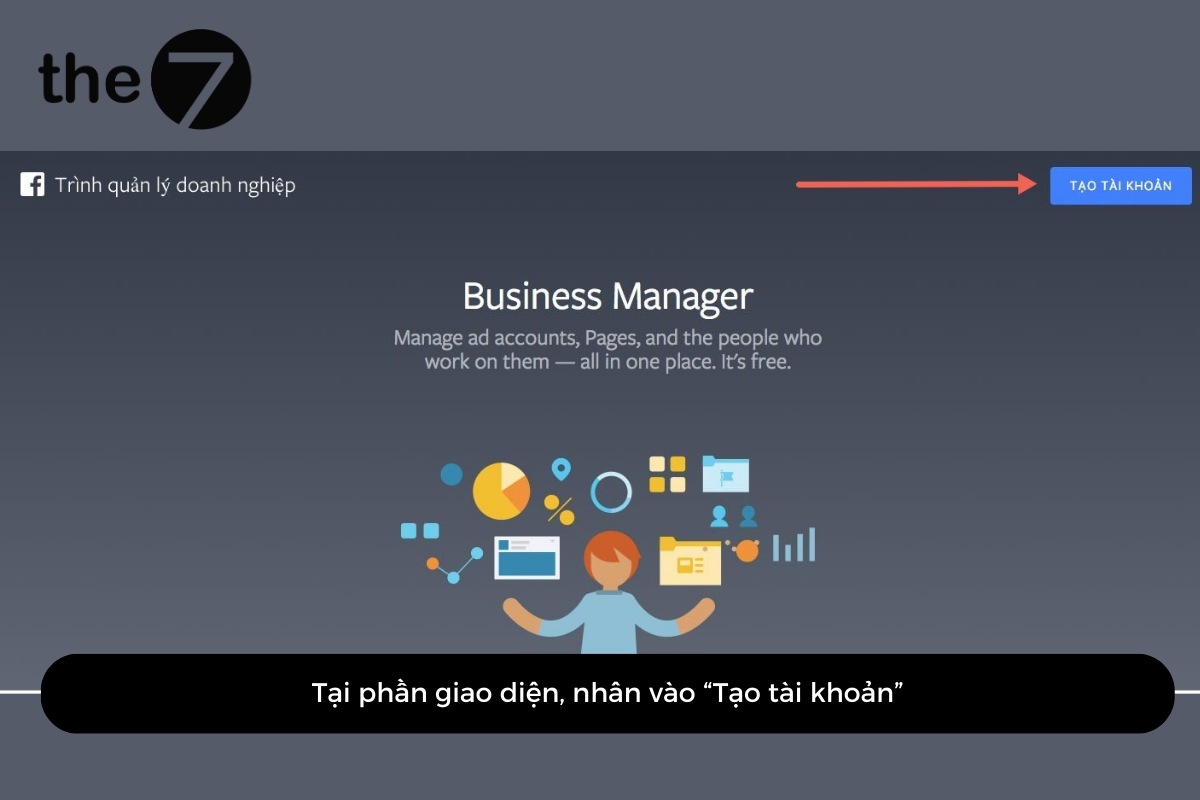
Step 2: In the interface, click “Create Account” in the right corner of the screen.
Step 3: A small window will appear. Name your Business account and click “Submit”.
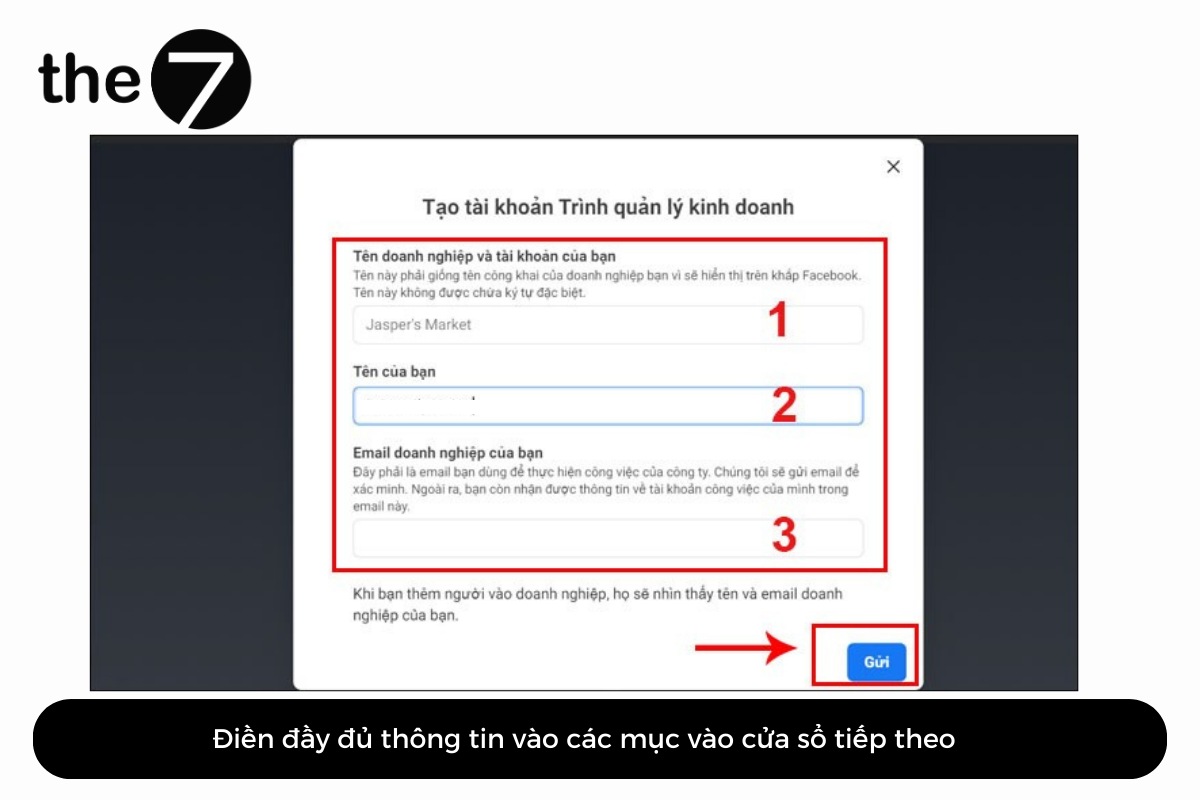
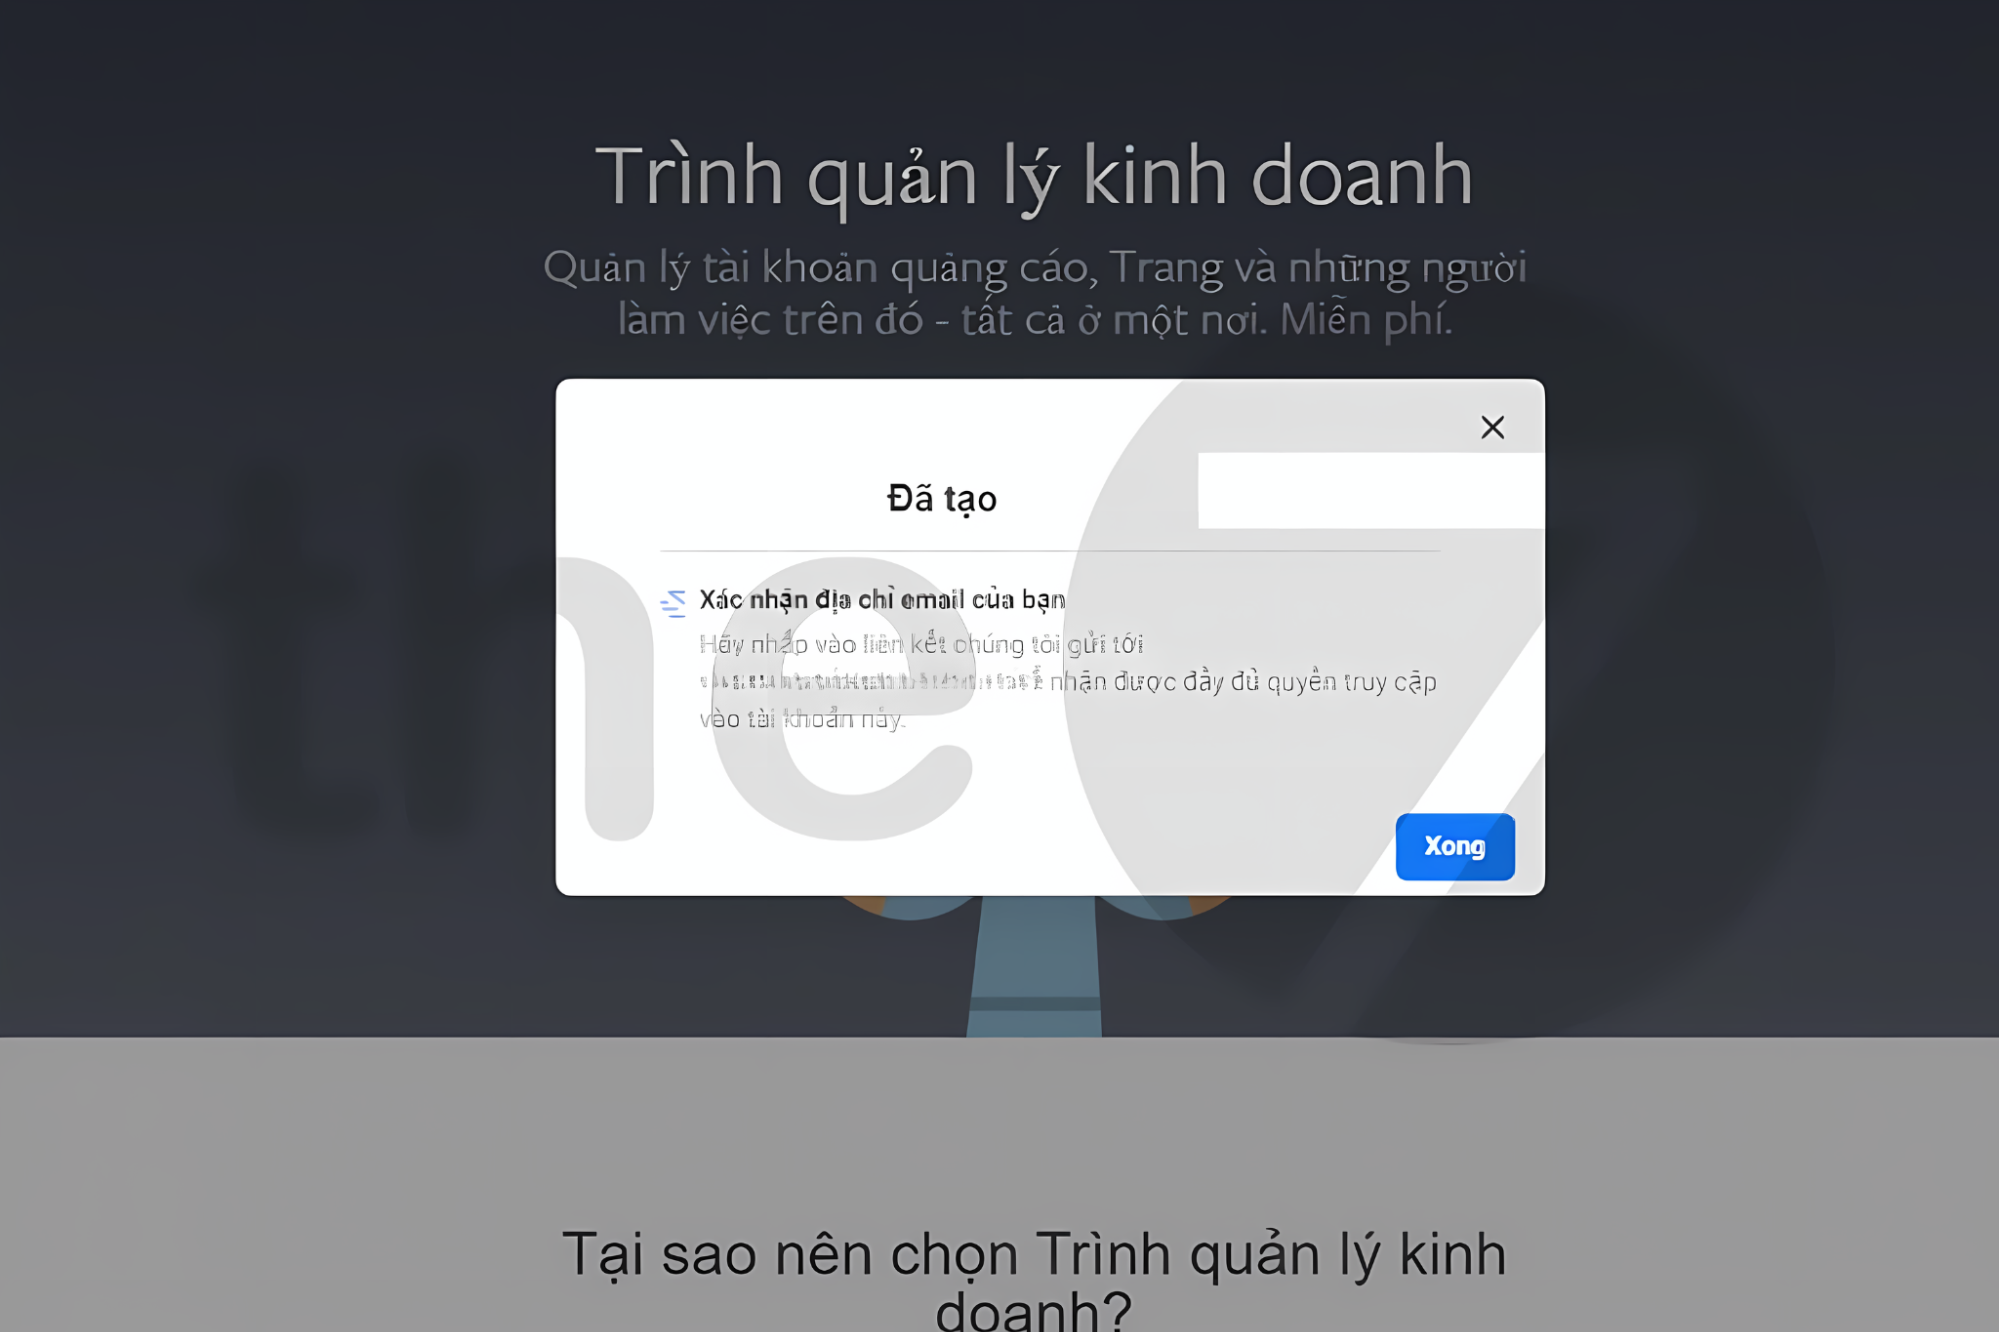
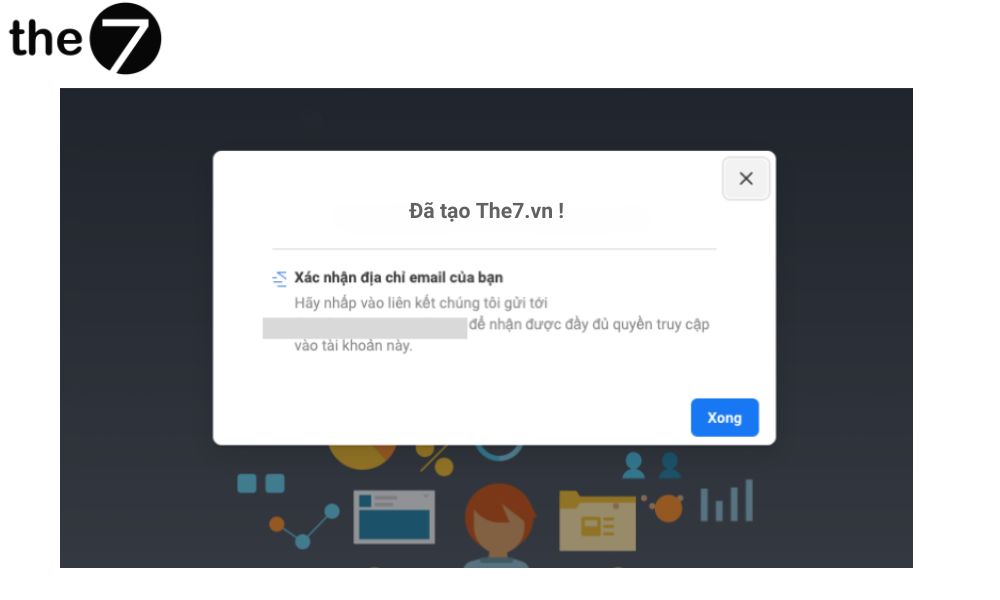
Step 4: After you click Submit, Facebook will send you an email to confirm your account. Confirm the account and click Done to finish.
Step 5: Once the email confirmation succeeds, the ad setup interface for your business will appear. Go through the basic setup steps as shown in the image.
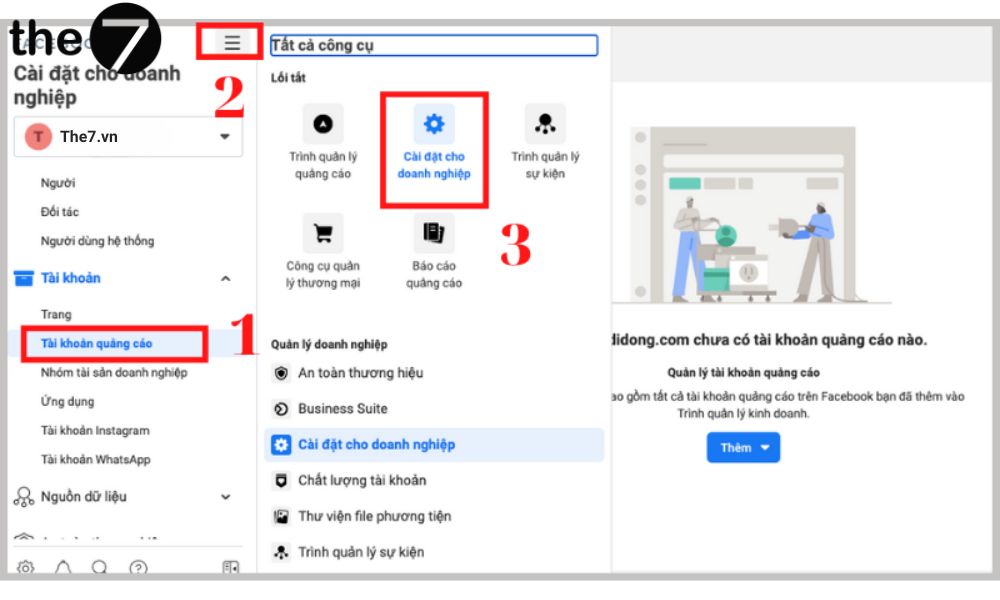
Step 6: Next, you need to add an account to get started. If you don’t have an ad account yet, create a new one as shown below.
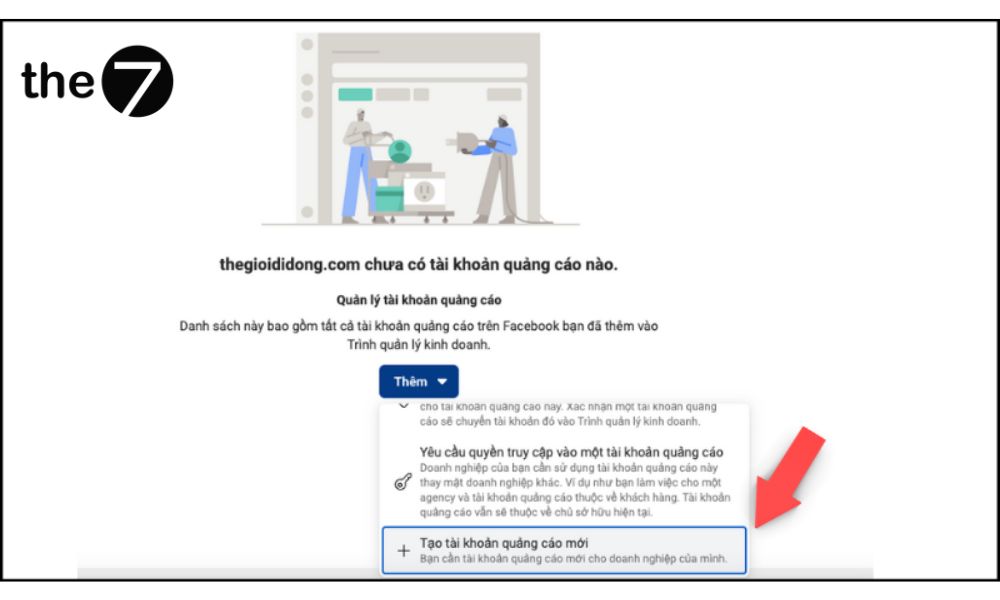
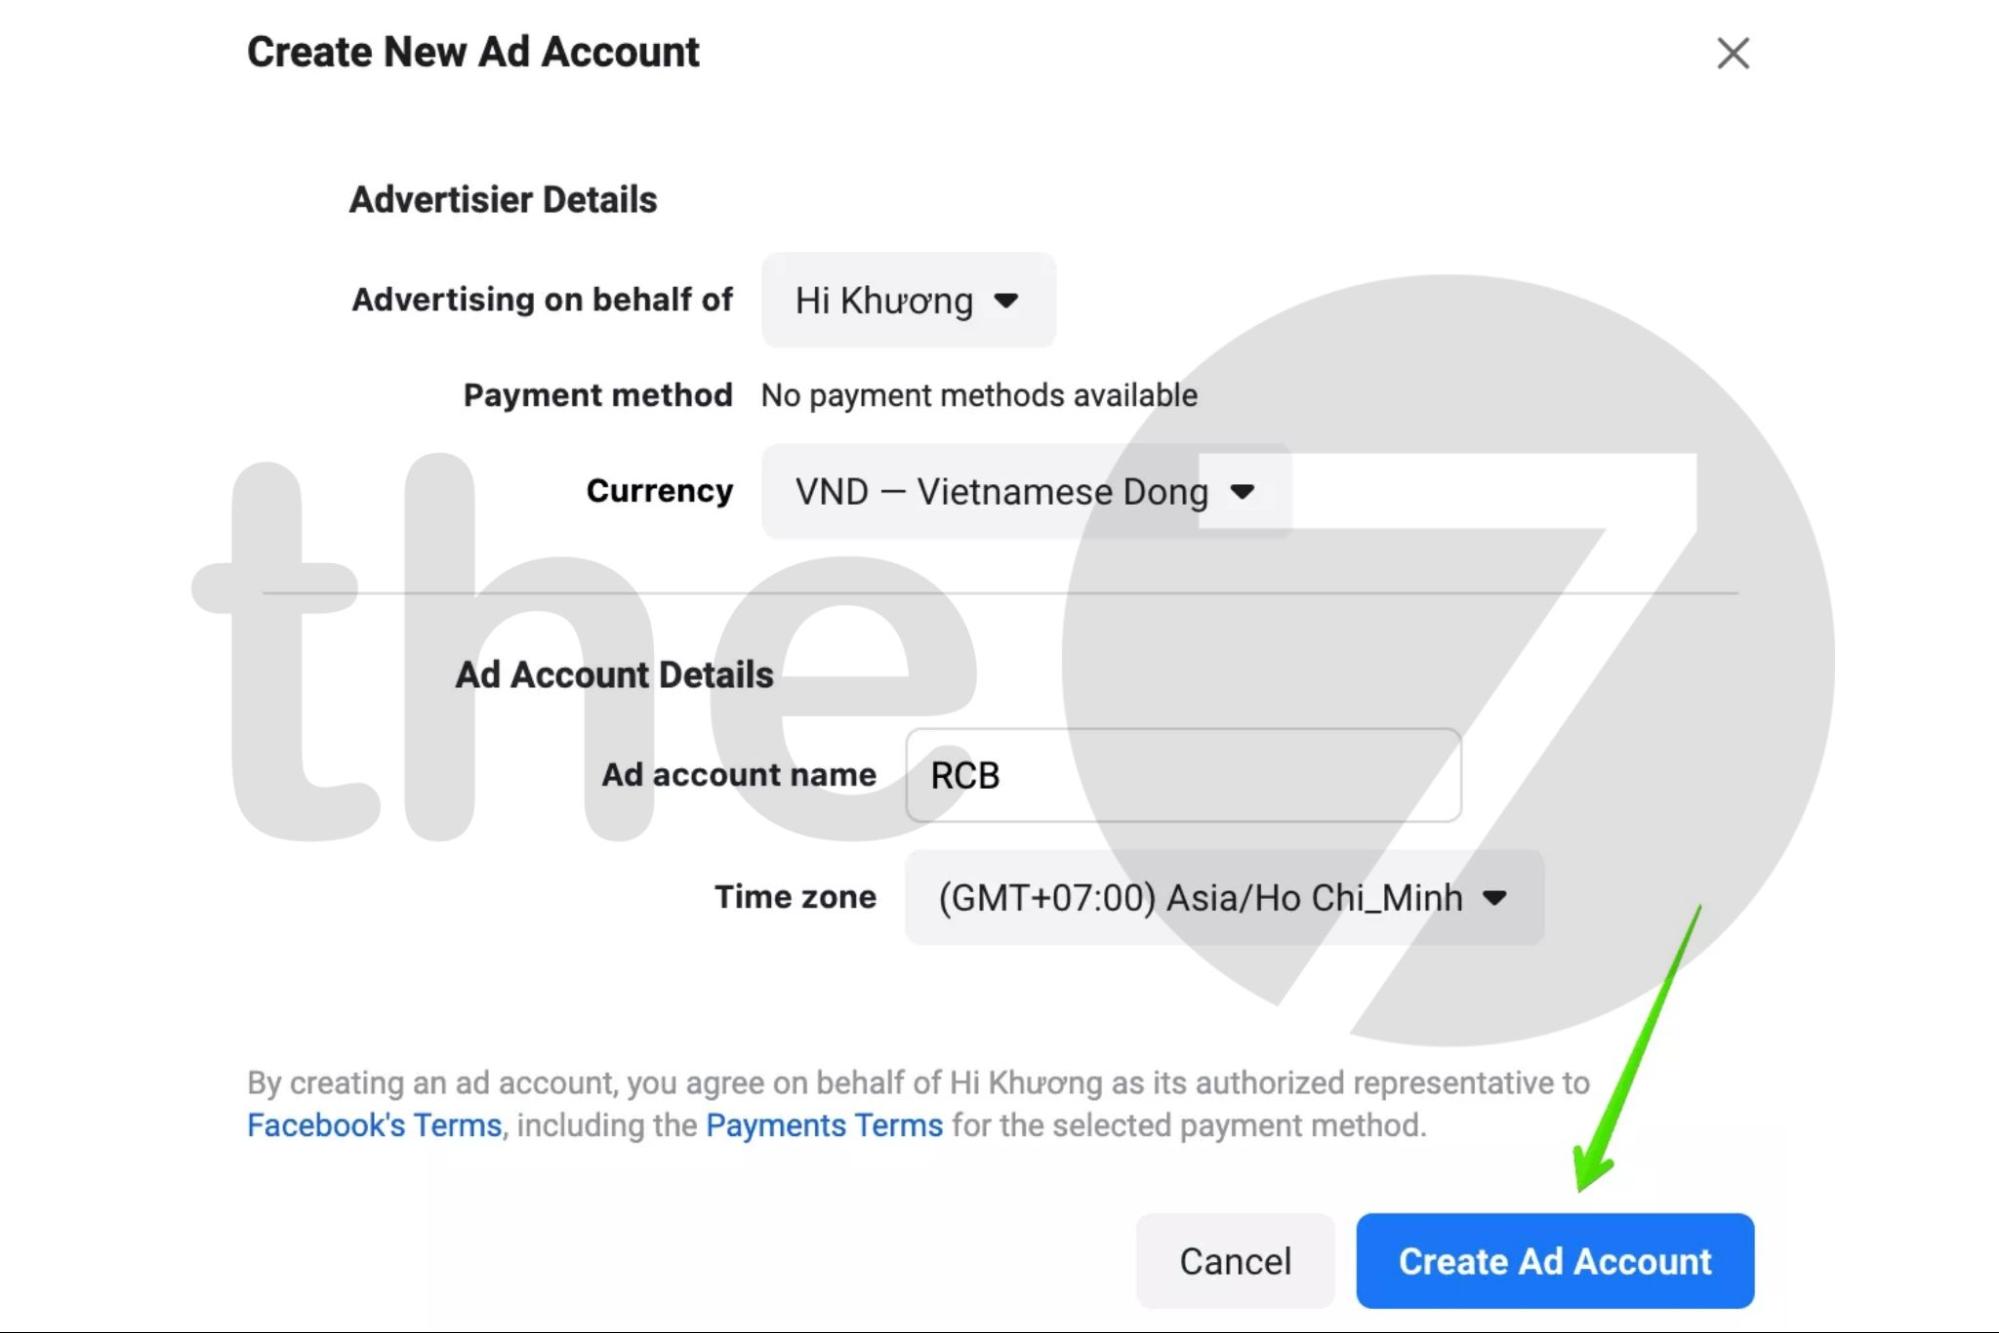
Step 7: Fill in all the information Facebook asks for, including the ad account name, time zone and currency.
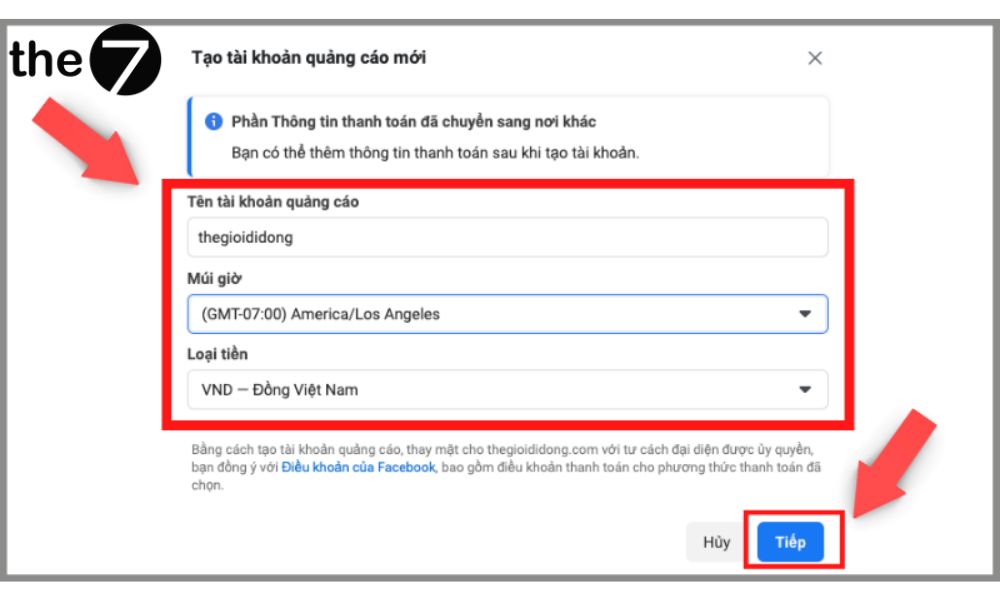
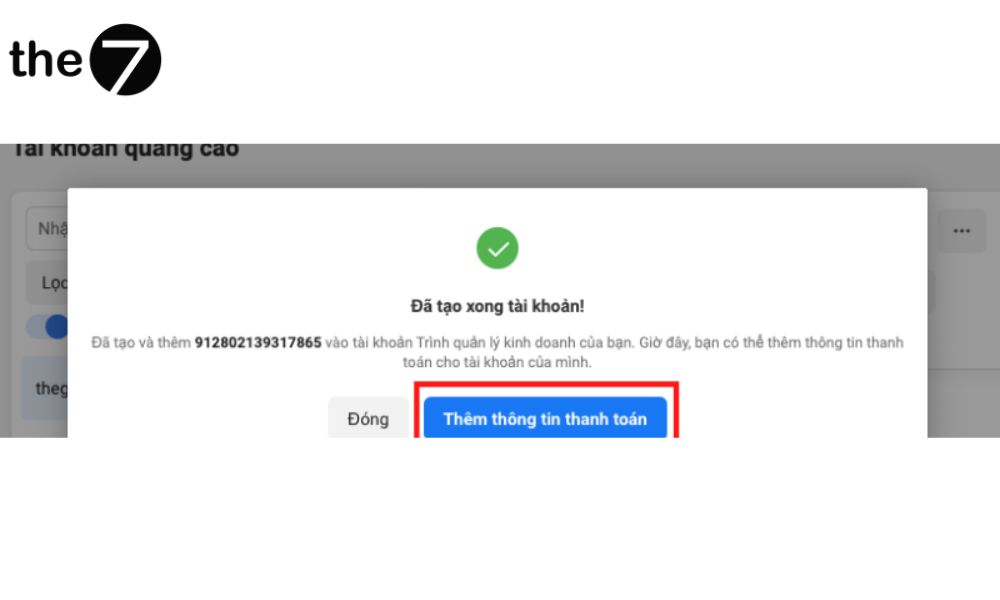
Step 8: Select the option to add payment information.
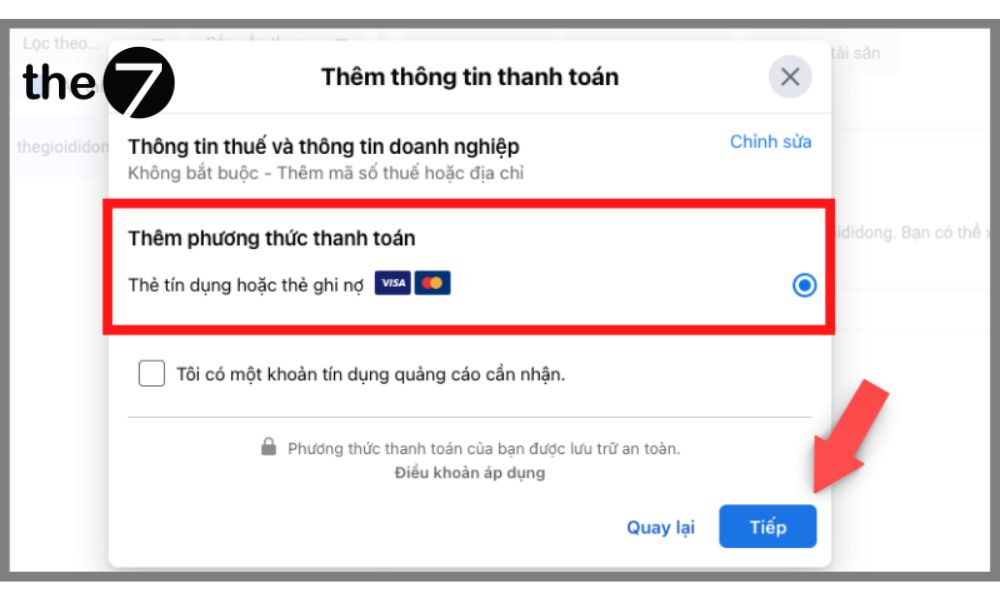
Step 9: Click Next after you’ve chosen the payment method that suits you.
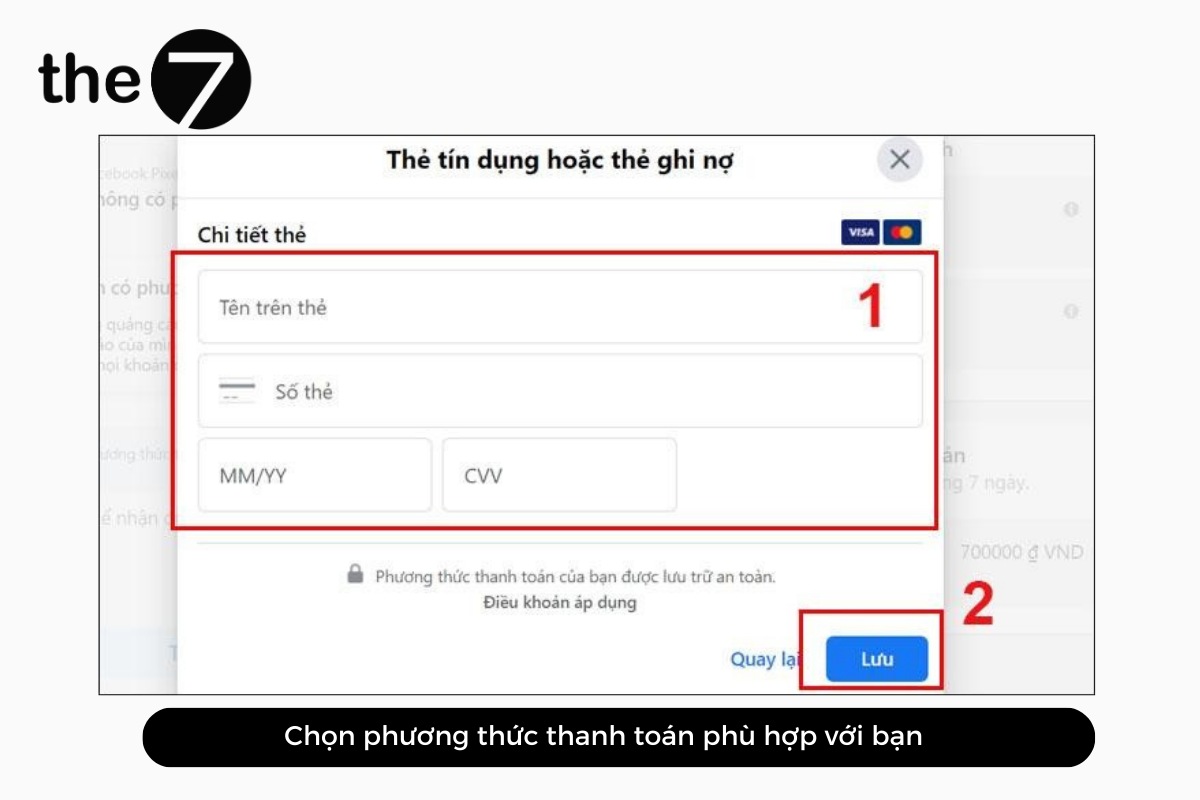
Step 10: Fill in all of your card details and click Save.
When you create a business ad account, pay close attention to the time zone and the payment currency. You must choose these two settings correctly from the start, because if you want to change either one later, you will have to create a new account.
Setting the Ad Time Zone
Your ad account’s time zone determines when a new day begins for your ads. Depending on the target market, each ad campaign will have its own suitable time zone strategy. In Vietnam, choose the GMT+07 time zone.
For other markets, the US for example, if you leave the time zone at GMT +07, your ads will reset their budget at midnight (which is daytime in the US), and that is not a good moment for selling.
Here are some time zones you can use when running ads in the US market:
- (GMT -05:00): ads reset at 12 noon.
- (GMT -07:00): ads reset at 2 p.m.
- (GMT -08:00): ads reset at 3 p.m.
Ad Currency
Facebook’s platform now supports many currencies to suit ad campaigns across many regions. However, in the Vietnam market we only need to care about two main currencies: Vietnamese Dong (VND) and US Dollar (USD).
In particular, whether you’re advertising in Vietnam or abroad, it’s still best to choose US dollars as your payment currency. Running ads in USD is much more stable, and newly created accounts spend budget faster.
Note: When you pay Facebook for your ad costs, you will be charged a foreign transaction fee if the currency you pay with is not USD. This fee is calculated as a percentage and varies by bank.
Ad Payment Timing
Facebook will charge your ad costs on two days: the 30th or the 31st at the end of the month.
When your ad account reaches one of Facebook’s payment thresholds ($25, $50, $100 and so on), Facebook Ads will automatically raise your payment threshold step by step, from $25 to $50. In other words, you’ll be allowed to owe up to $50 in payments while running ads.
>>> See more: A simple guide to adding funds to a Facebook ad account
Activating Your Facebook Ad Account
The steps to activate an ad account are:
Step 1: Go to Facebook Ads Manager (Facebook’s ad management tool).
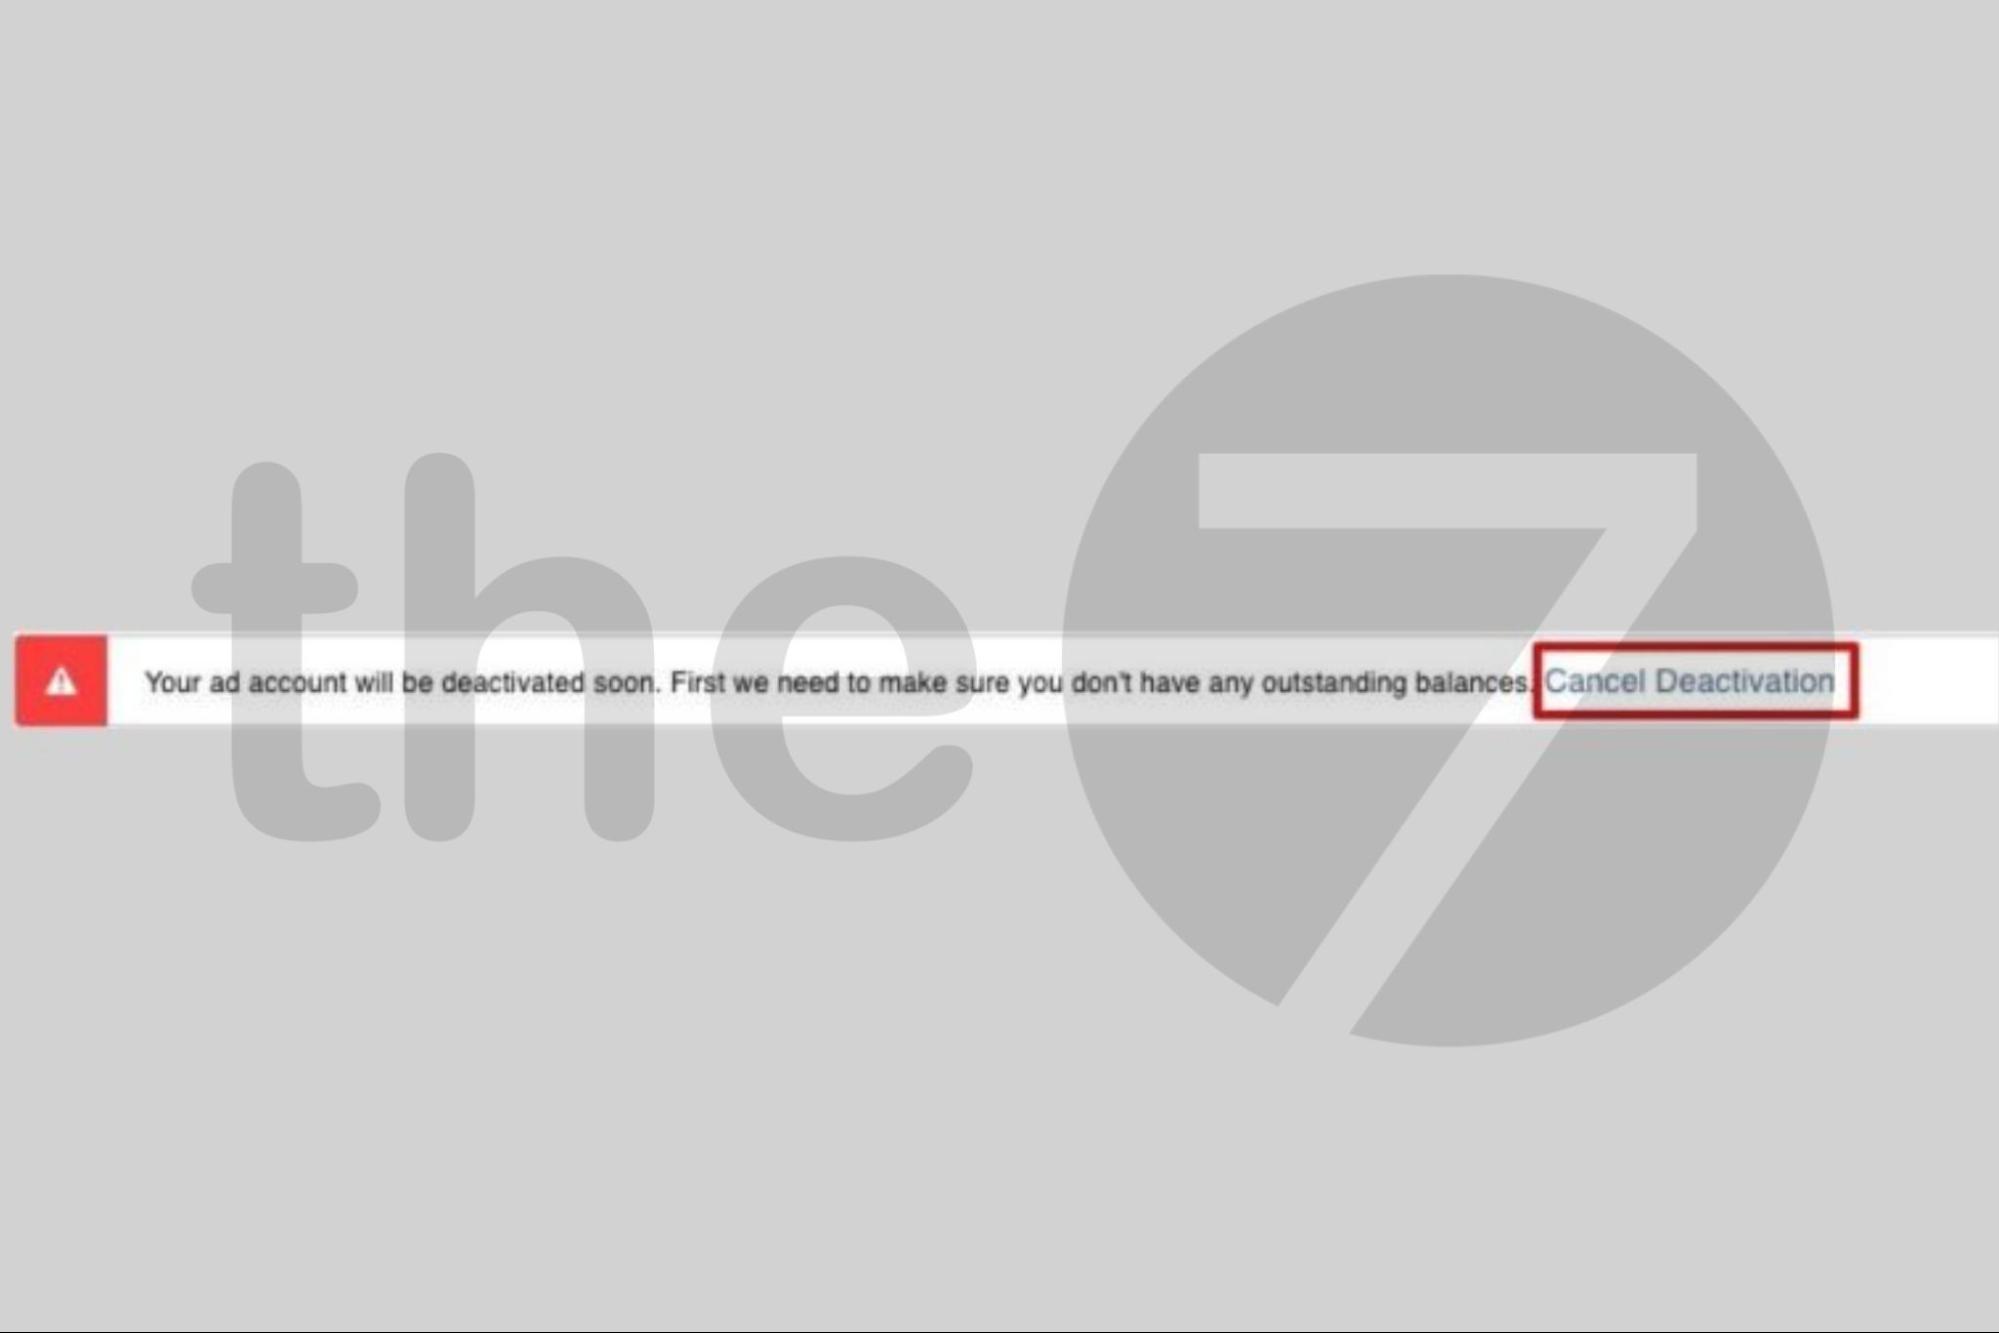
Step 2: You will see a notice from Facebook that says “Account is disabled”. Click the blue “Cancel Deactivate” text. Once you’ve done this, your ad account will work normally.
Adding a Payment Method
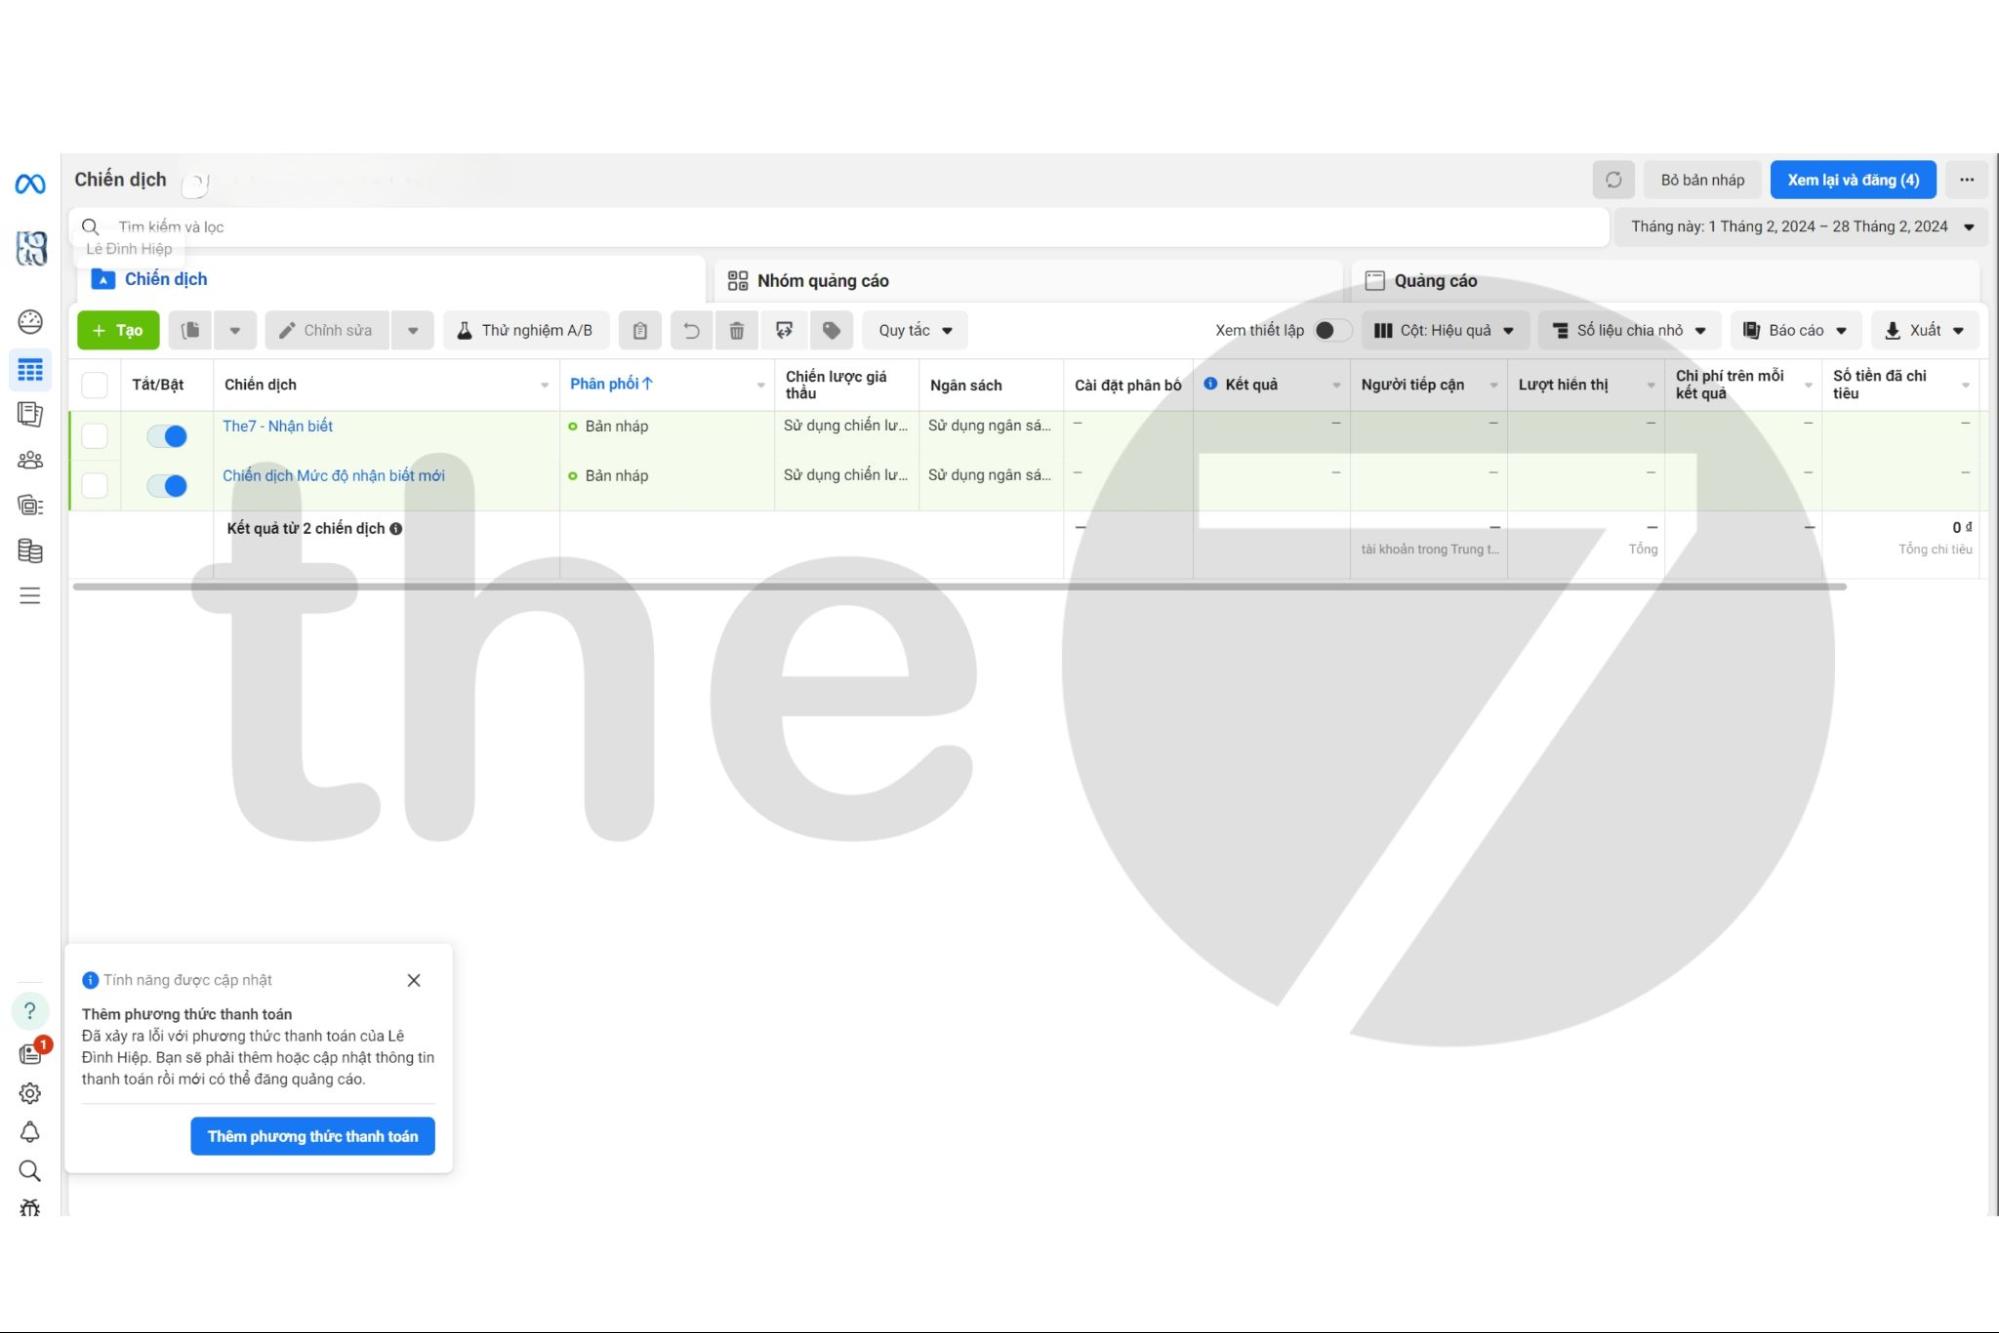
The steps to add a payment method to your ad account are:
Step 1: Select the “Billing Payment” section.
Step 2: Choose the ad account you want to add a payment method to.
Step 3: Click “Add Payment Method” on the right-hand side.
Step 4: Enter your Visa/MasterCard details to pay for Facebook Ads. The details include:
- Card number
- Card expiration date (month/year)
- Security code (CVV)
Click “Continue” after you finish entering the information. If the card is accepted, Facebook will notify you, along with the card type you entered and the last 4 digits of the card.
At this point, you’ve completed the process of creating a Facebook ad account and can run ads as usual.
Things to Keep in Mind When Creating a Facebook Ad Account
Here are some things to keep in mind when creating a Facebook ad account, so that you meet the requirements for running Facebook ads that you need to prepare:
- Have a personal Facebook account that has been verified with a phone number on Facebook for at least 10 days.
- The account must have all the necessary profile information and must never have run ads before.
- Link a MoMo account or a Visa/MasterCard to pay for ad costs. Never use PayPal, to avoid being flagged.
- Use only one account to run ads, to avoid Facebook locking the account after detecting a duplicate IP.
- Do your best to follow the policies Facebook sets out and avoid advertising policy violations.
How to Add an Admin to Your Facebook Ad Account
There are two ways to add an ad admin:
- Method 1: Add them in Business Manager.
- Method 2: Add them in Ads Manager.
Method 1 is the easiest, and you can follow these steps:
Step 1: Add the person you want to give admin rights to in Business Manager, and wait for them to accept the invitation.
Step 2: Go to Business Settings => Users => People => Add.
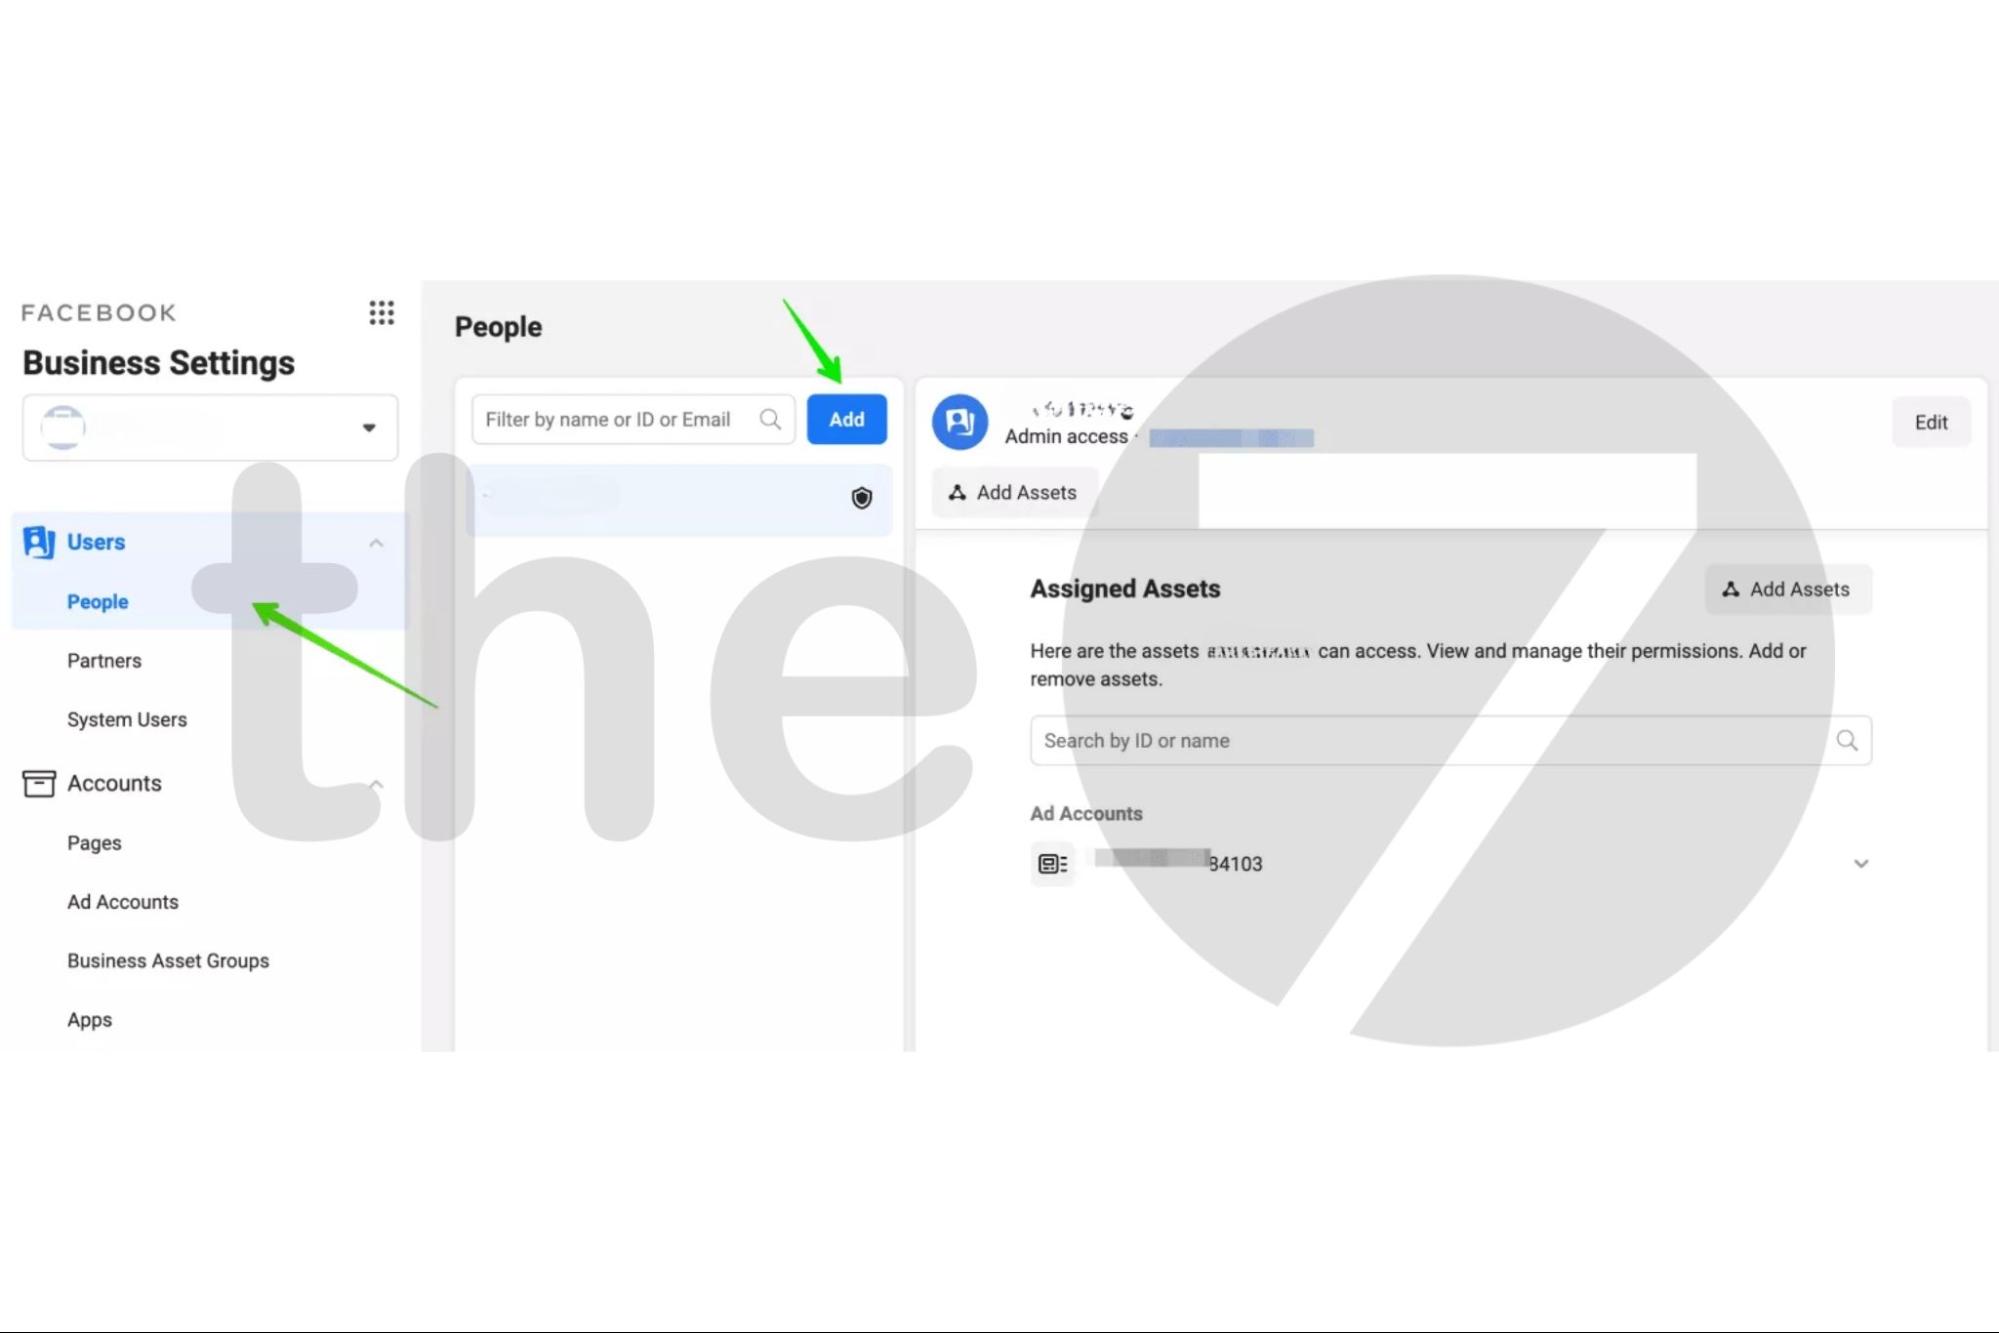
The first step in adding an admin to a Facebook ad account
Step 3: Enter the email the person you want to give admin rights to used to register for Facebook. There are 2 permission levels: Employee access (they can only access the ad account) and Admin Access (they are granted full access).
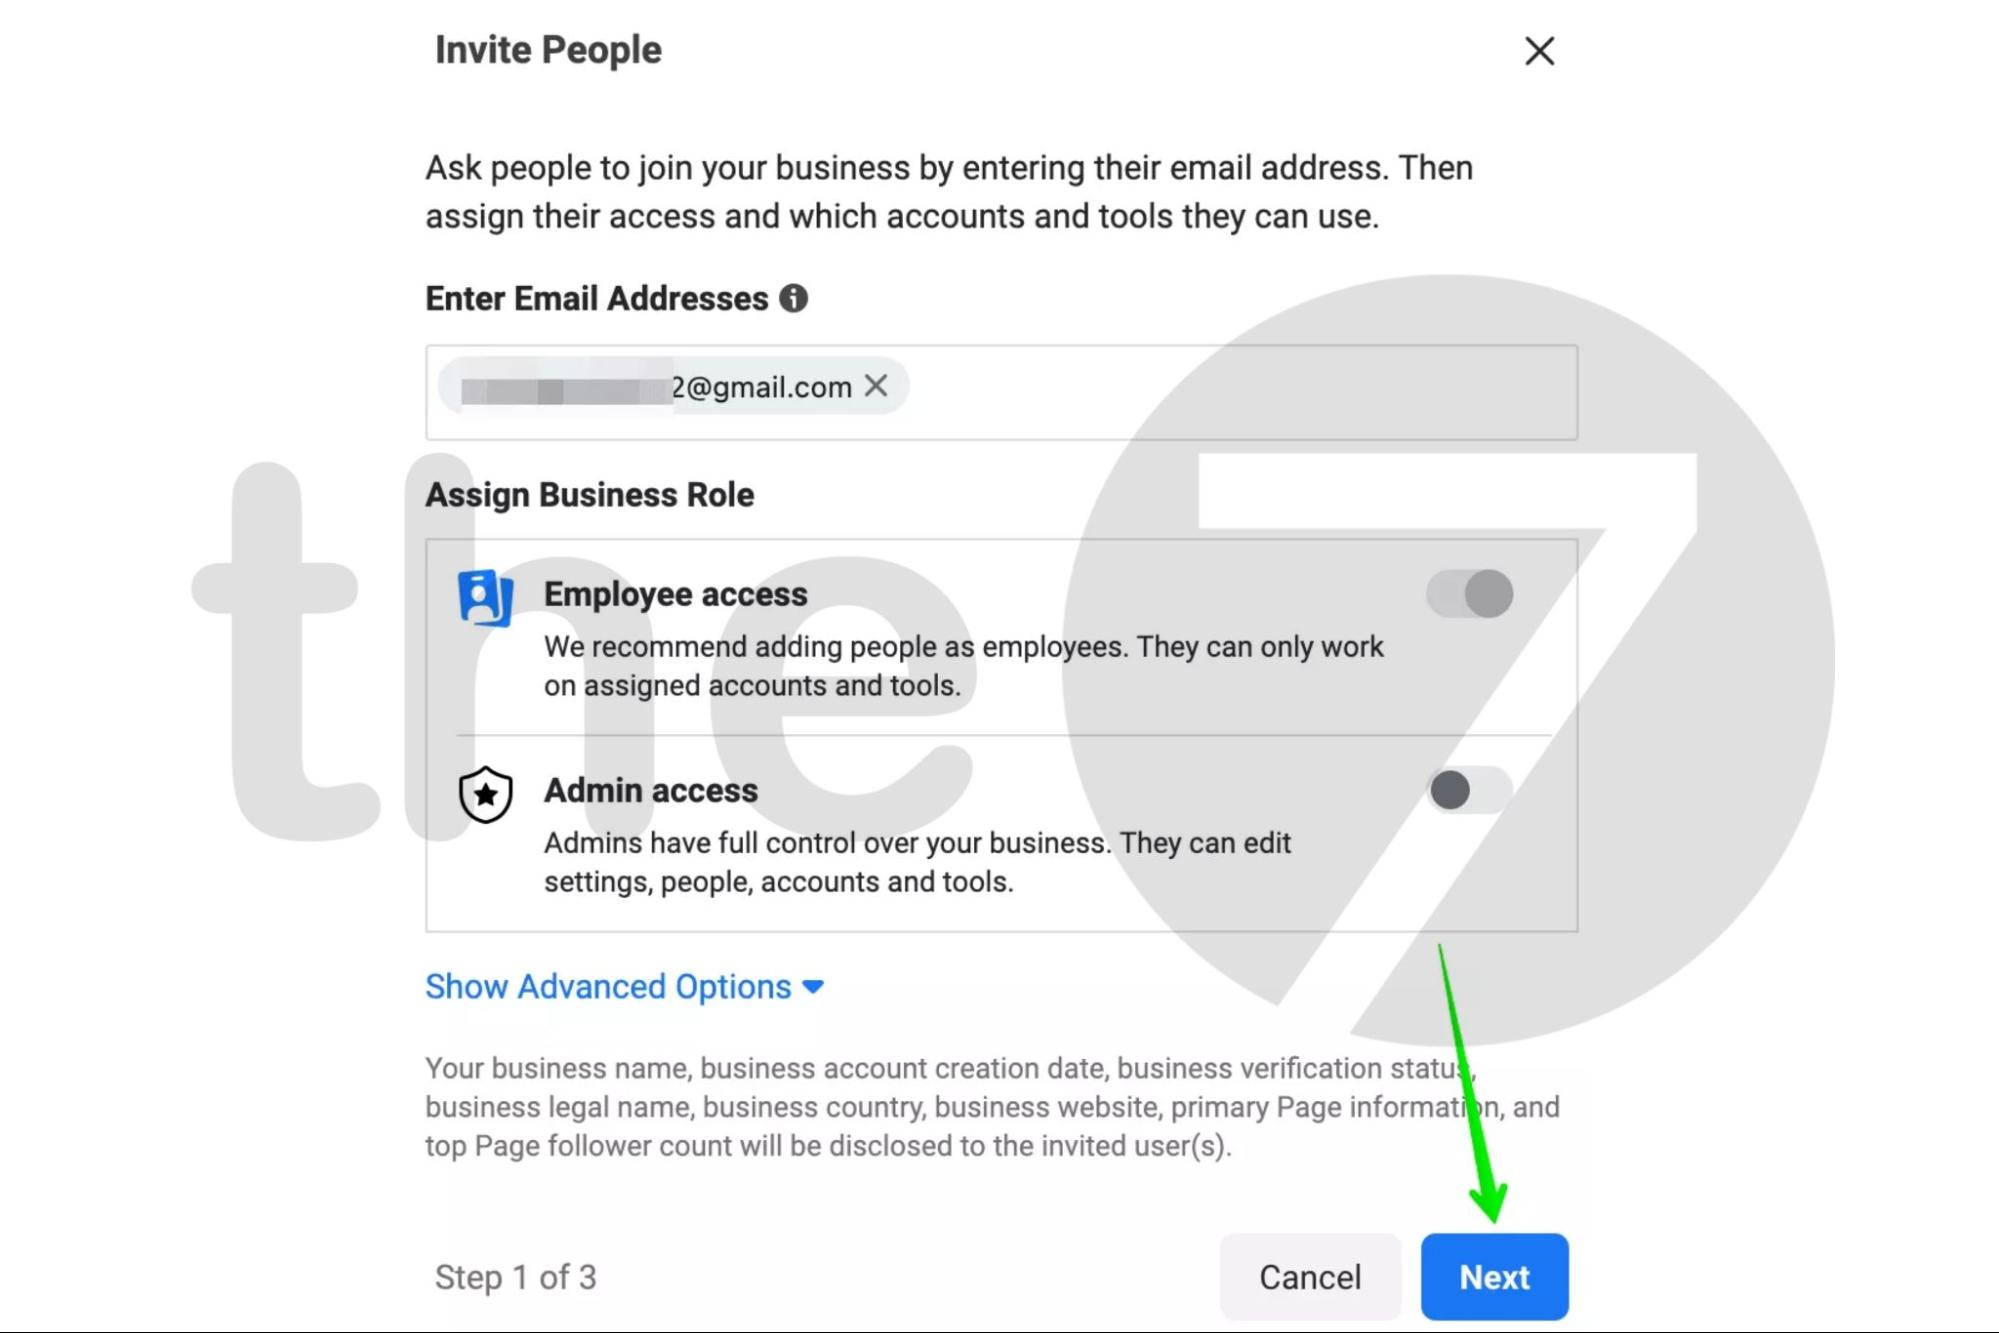
Step 4: Click Invite and you’re done.
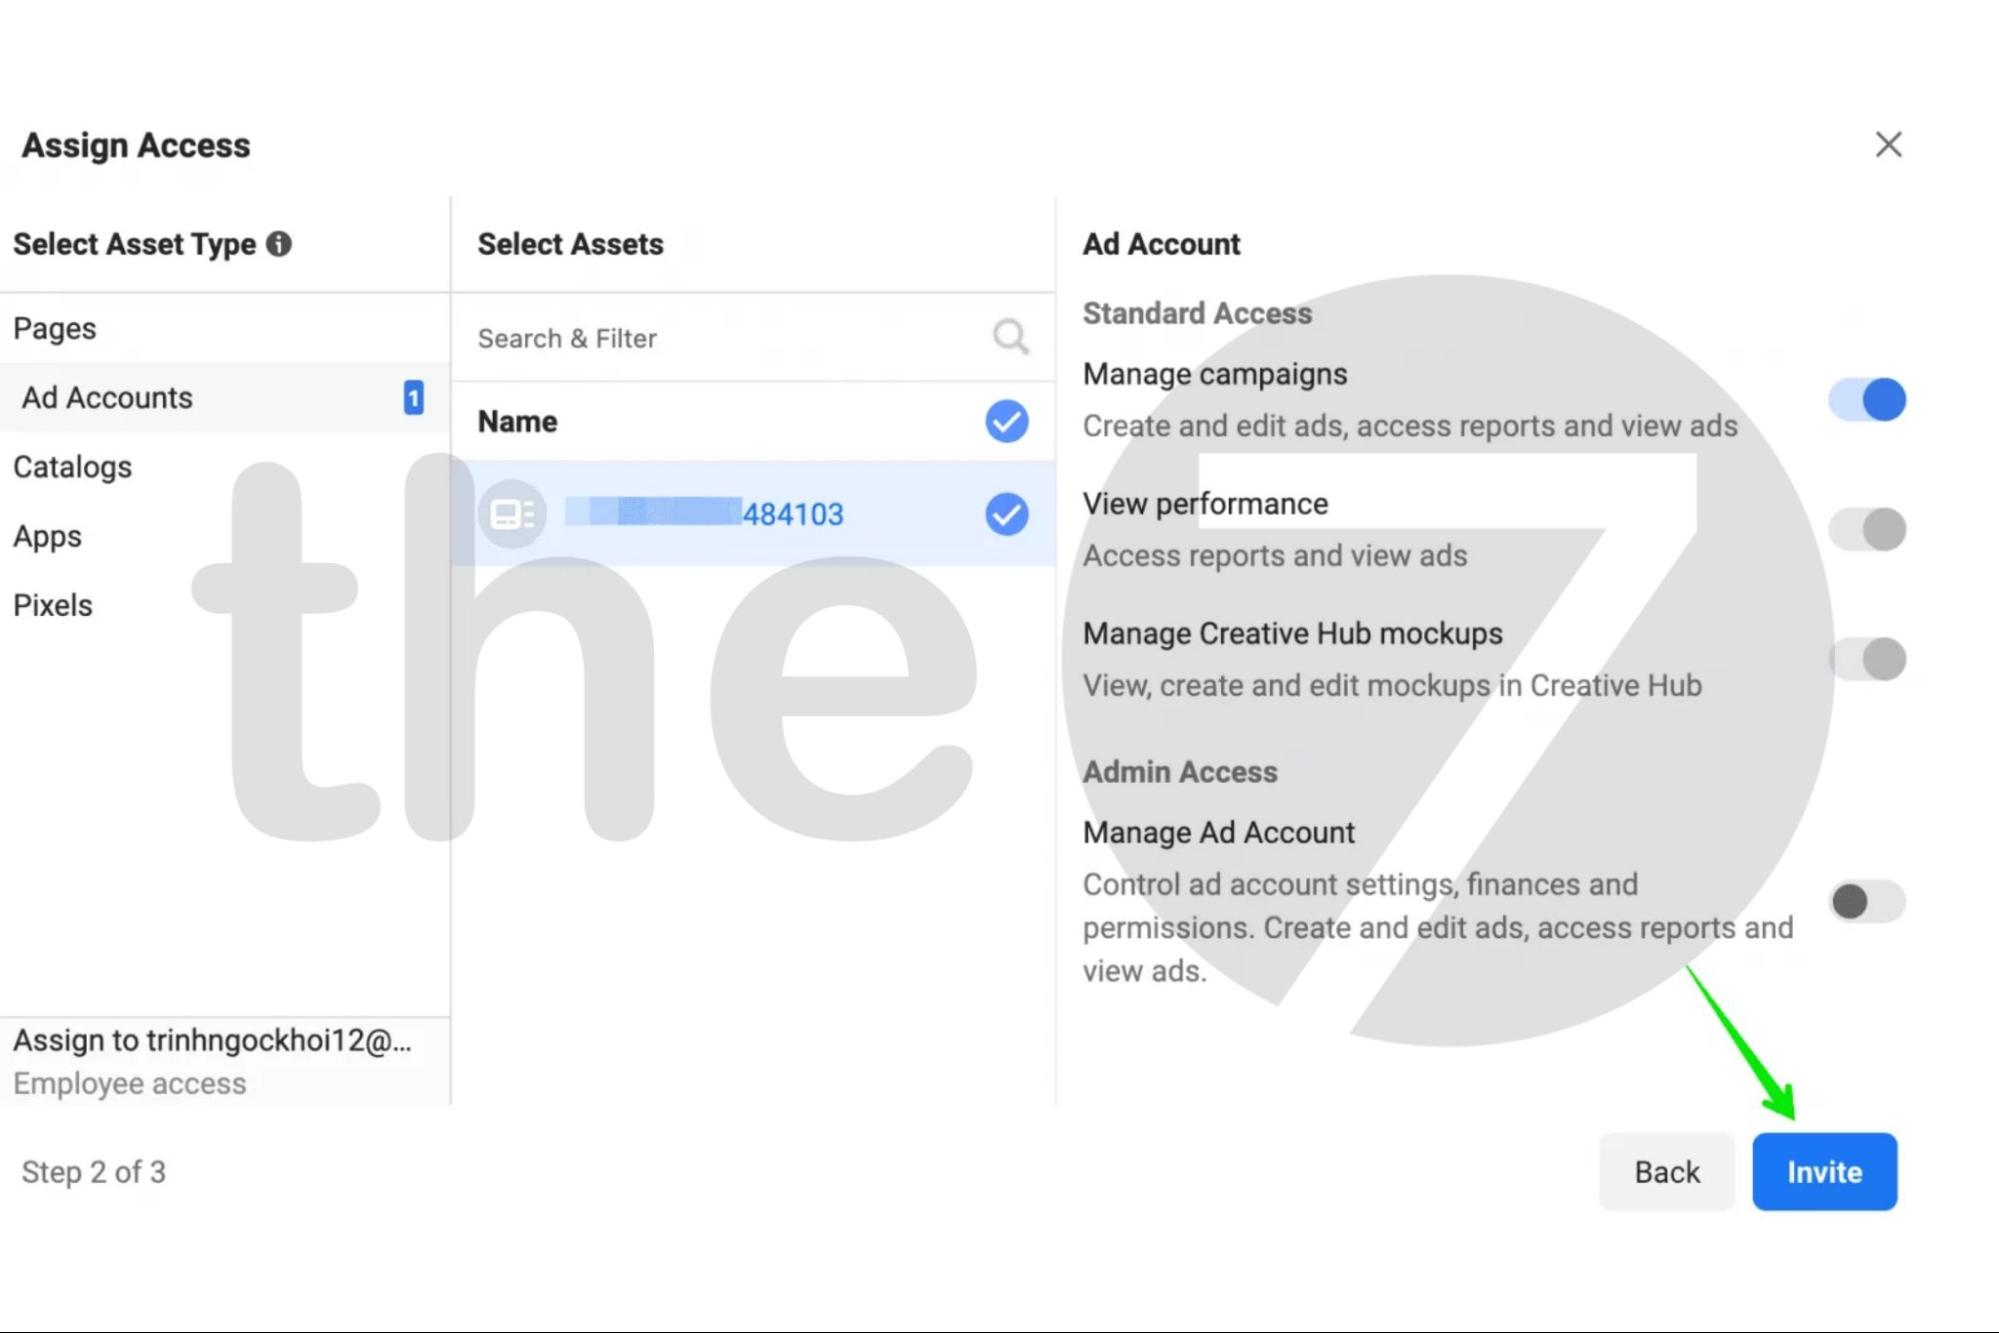
That is the detailed, simple way to create a Facebook ad account. However, be careful while creating your account, because it will affect the performance of your ad campaigns. If you need a professional provider of Facebook advertising services, call the hotline of The7 at 0827386886 for a consultation.
>>> You can also check out these related articles:
- What Is Facebook Ads? Learn About Facebook Advertising in 2024
- Requirements for Running Facebook Ads Successfully and Effectively

Nguyễn Đình
Bảo




As CEO of The7, I am committed to sharing practical, useful knowledge with every reader. Every article on The7 is based on my 7 years of hands-on experience in marketing — Facebook advertising, LinkedIn advertising, Google advertising, and marketing strategy. I hope you take away plenty of insight from these posts and apply it successfully in practice.
Related Articles

What Is Facebook Ads? Popular Types of Facebook Advertising
What is Facebook Ads? This is surely a question many people wonder about, especially those just starting to learn about Facebook advertising. Let’s explore Facebook Ads from A to Z...

26 Predictions for Social Media Marketing Trends in 2025
It’s that familiar time of year again, when experts and analysts start revealing their predictions for the social media marketing trends worth watching, along with the shifts that promise to...

How to Run Facebook Ads: 2024 Step-by-Step Guide
How can you run Facebook ads effectively, reach the right target customers, and generate valuable conversions? This is probably a question many Digital Marketers and business owners ask when promoting...
Requirements for Running Facebook Ads Successfully and Effectively
When you start your Facebook advertising journey, mastering the basics is the key to success. So what are the requirements for running Facebook ads exactly? Let’s begin exploring and optimizing...

Facebook Video Ad Size: The Most Accurate Guide for 2024
Running video ads is becoming the go-to choice for many businesses. In this context, the Facebook video ad size plays a key role in determining how well your post performs....
7 Highly Effective Ways to Optimize Facebook Ads in 2024
Optimizing Facebook ads plays a vital role in your marketing. It helps you improve ad delivery, reach, ad engagement, conversion rate and advertising costs. Join The7 as we walk through...